
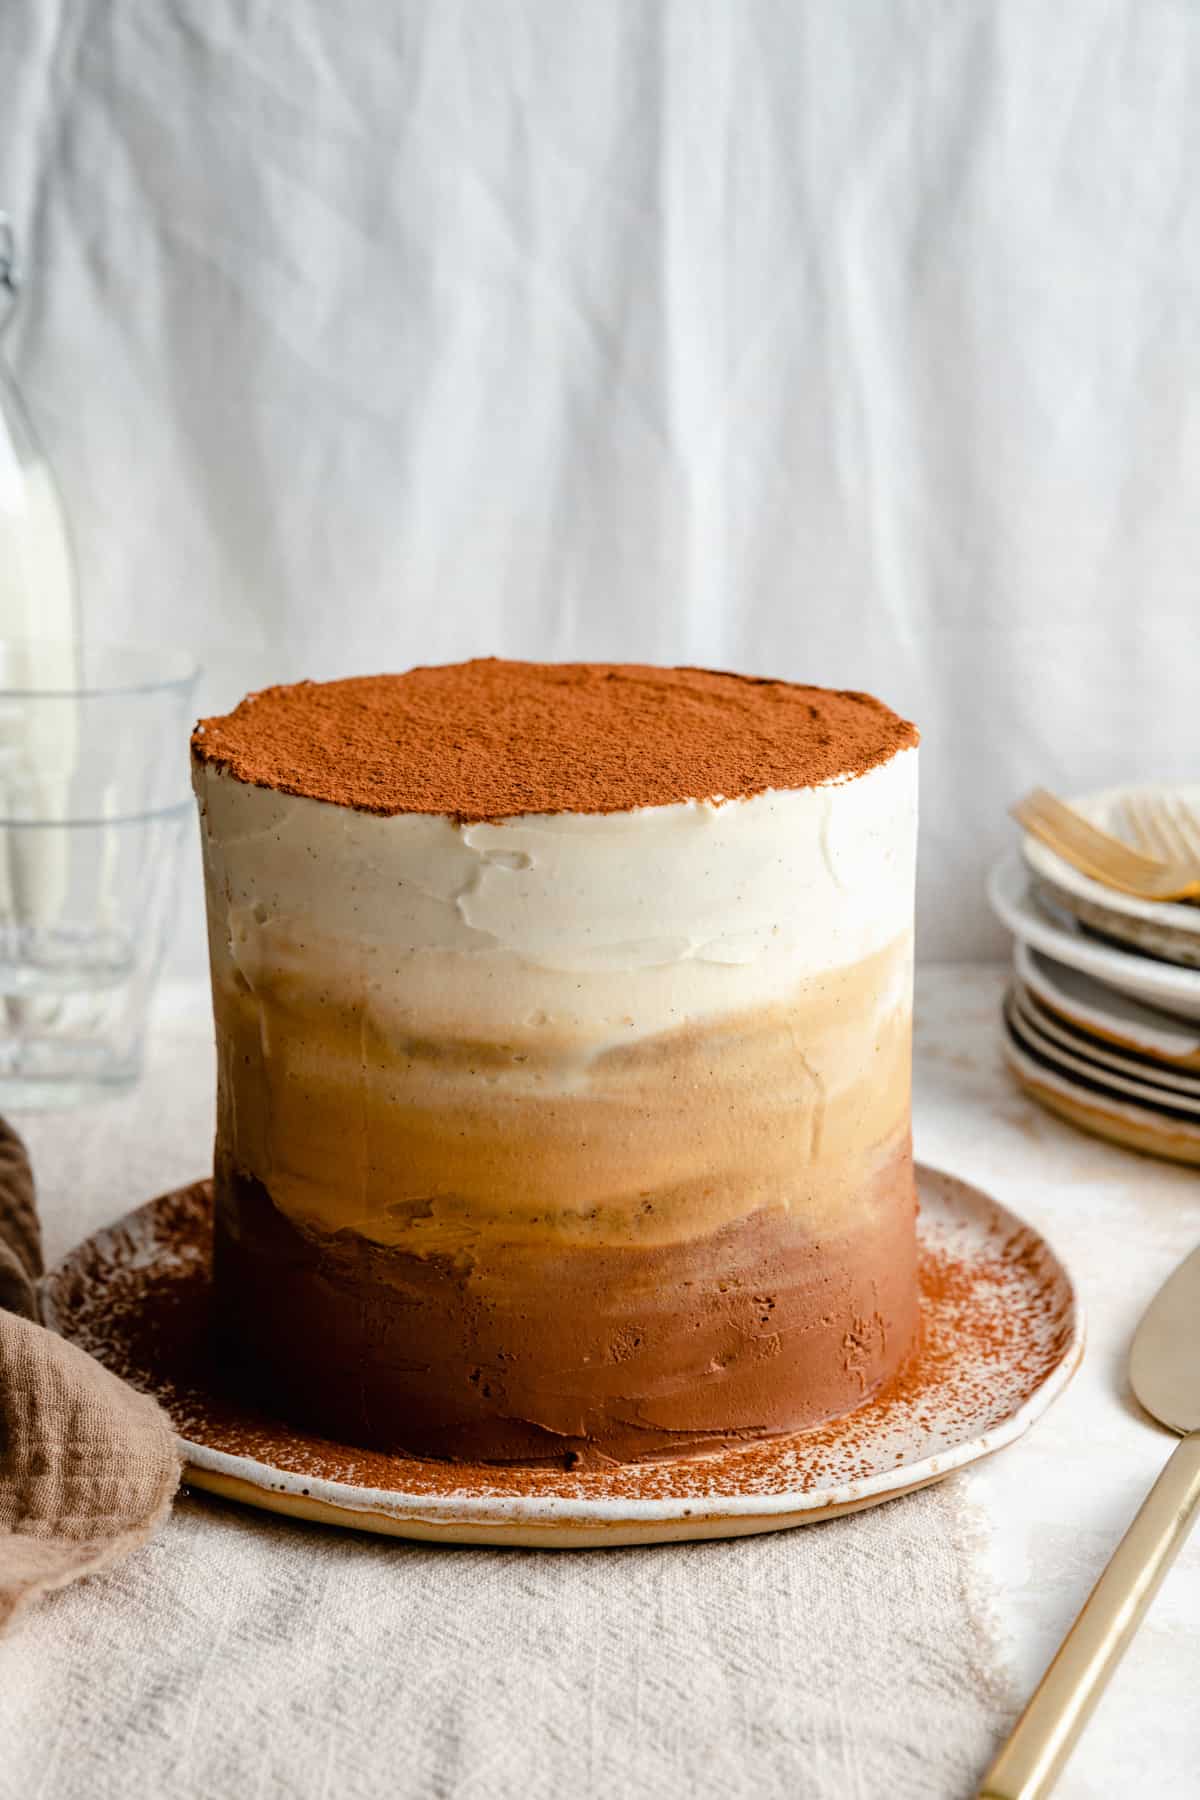
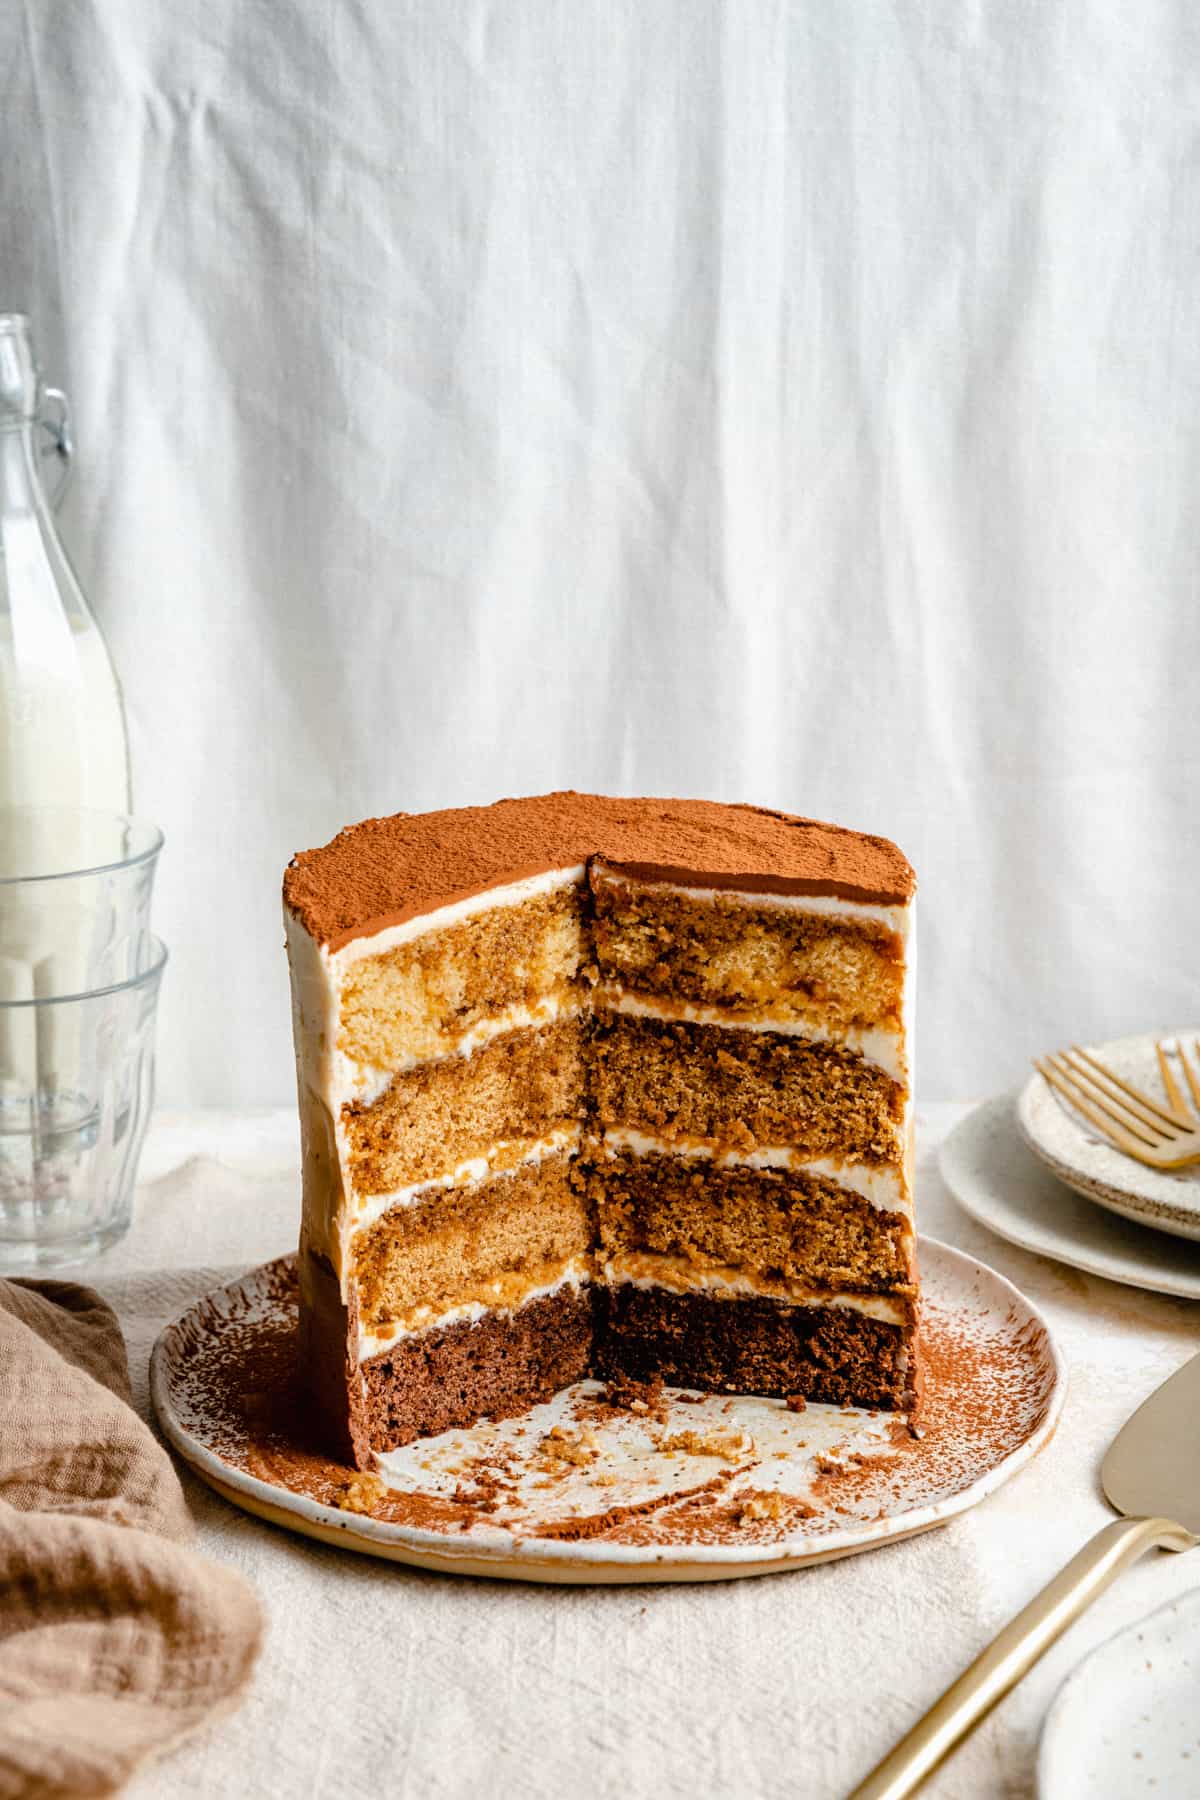
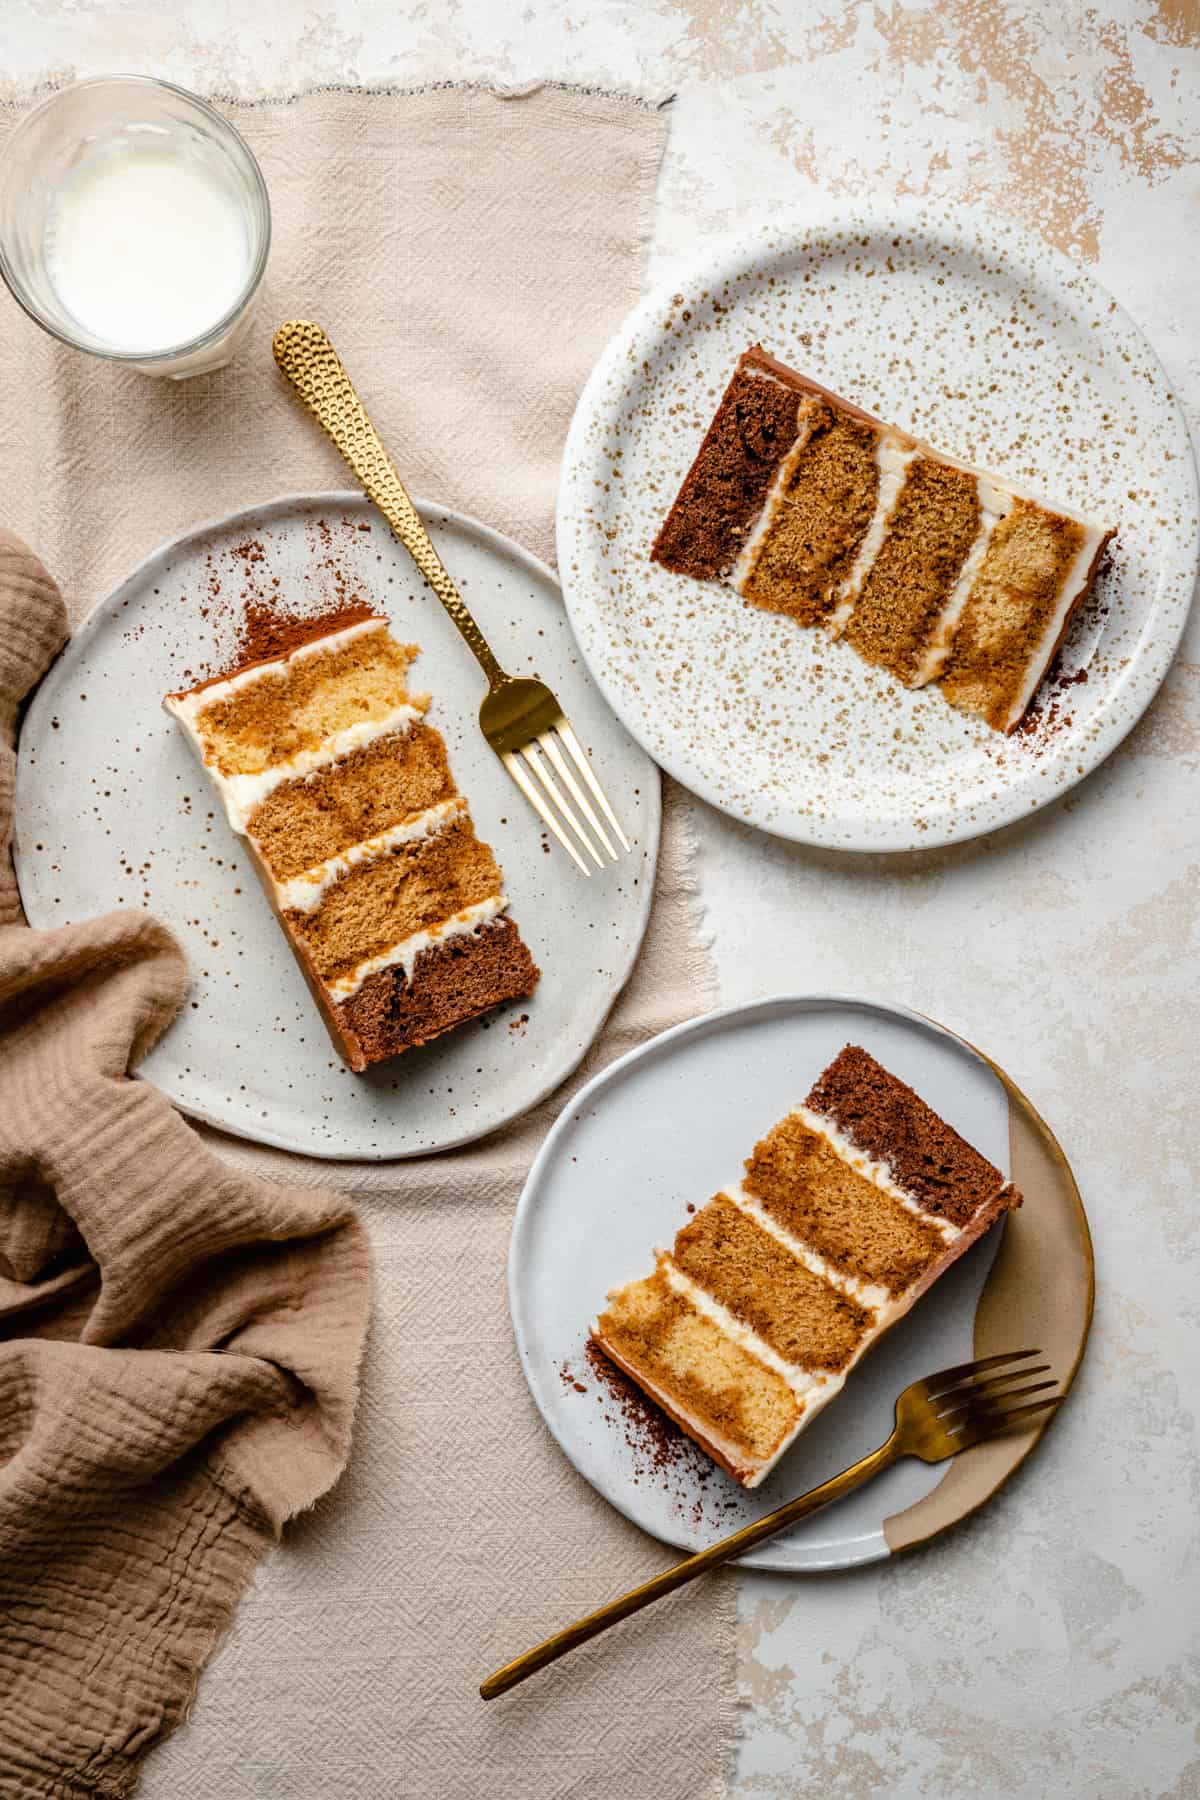
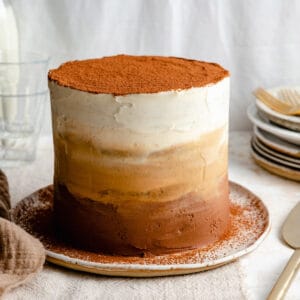
This is the OG Tiramisu Cake with perfectly fluffy ombre sponge cake layers and wrapped in a beautiful ombre mascarpone frosting. It's the ultimate way to impress your loved ones for their special celebrations.
THIS CAKE. This is the OG Tiramisu Cake with ombre mascarpone frosting, it went viral back in 2016 when it first got posted and has been made by many, many people since.
Our tiramisu cake is super special and perfect for birthdays, or any special occasion! Made up of four 6-inch layers individually flavoured with chocolate, coffee and vanilla, soaked with coffee syrup and all sandwiched together with an insanely delicious mascarpone frosting, it literally is TO DIE FOR. It's that good!
You may see many copies out there, but this is the ORIGINAL ombre style multi layered tiramisu cake. We promise you light and airy sponge packed with serious flavour! Even Molly Yeh raved about it back in the day and created her own version. Be sure to check out our Passionfruit Layer Cake or Strawberry and Elderflower Cake if you're in the mood for more layer cakes.
Trust us, everyone needs this Italian tiramisu cake in their lives. We love hearing from you, so why not drop us a comment and rating in the recipe card below! This is a straight forward recipe but can seem overwhelming as it contains several steps, use the links below to get to exactly where you want in this post. We've got all the tips and tricks you need!
Jump to:
Why this recipe works
These are the reasons you need this tiramisu cake recipe in your life:
True, tried and tested - this tiramisu cake has recently been tested thoroughly to ensure you will get the results you see. Check out the pinch points and expert tips below to help you.
Ombre frosting - the frosting for this tiramisu cake is insane, it's what brings this whole cake together and makes it taste of tiramisu without any doubt! The creamy mascarpone is literally the perfect finish and looks stunning too.
Easier than you think - this Italian tiramisu cake looks impressive, which can seem overwhelming, but with all the step by step photos we have for you, this is actually a very simple cake to make.
Celebratory centrepiece - you will be everyone's favourite when you show up with this Italian tiramisu cake to your loved ones' birthday or any celebration!
Modern twist - this cake is a lovely modern twist on the traditional Italian tiramisu using sponge cake rather than ladyfingers/savoiardi. Impress with your new found baking skills.
Ingredients
You only need simple ingredients for this Tiramisu Cake, all should be readily available at most supermarkets, this is what you'll need:
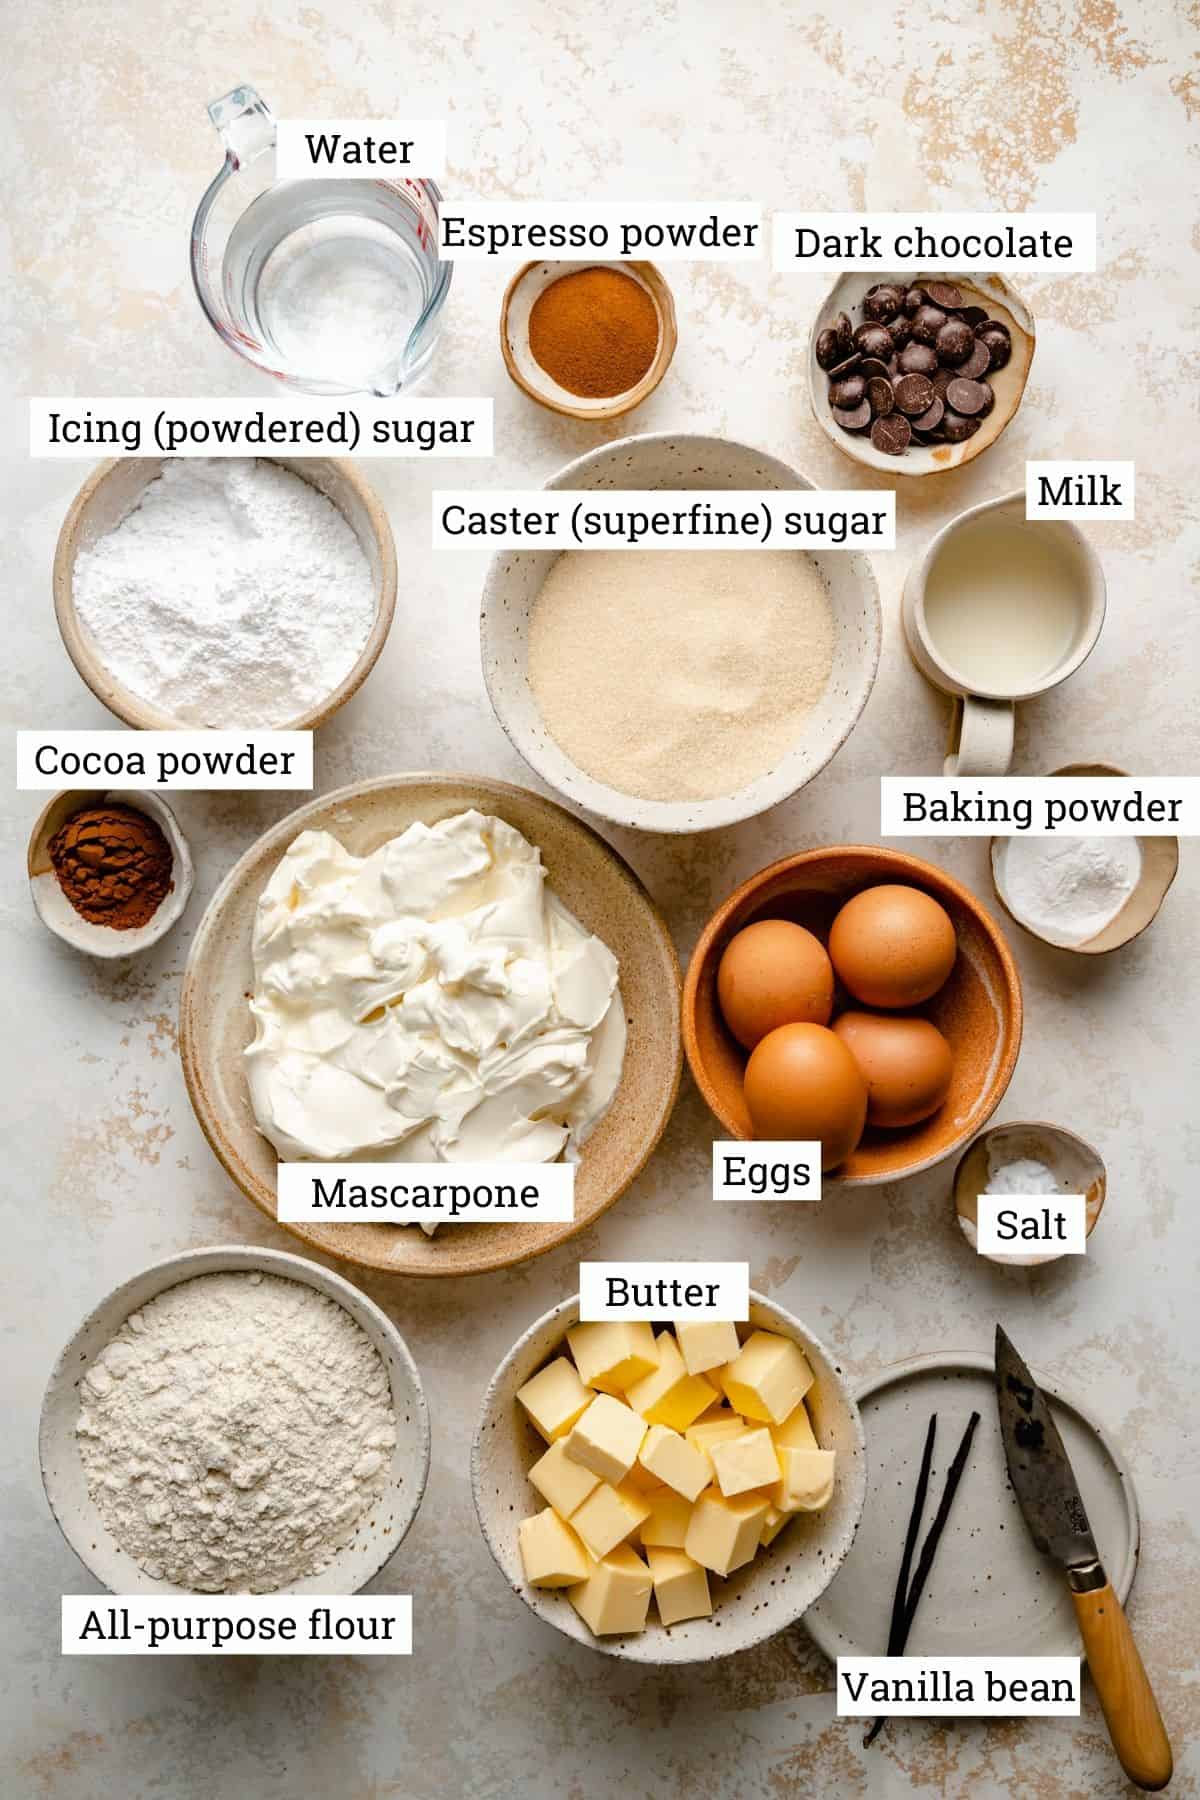
Baking essentials - you'll need standard baking essentials; all purpose flour, butter, sugar, eggs, vanilla bean/extract and salt.
Espresso powder - Tiramisu is famously flavoured with coffee, you'll need the fine espresso coffee powder, NOT large granules. If you don't drink or consume coffee, you can definitely use a coffee alternative powder. Both work extremely well, but it HAS to be fine powder.
Cocoa powder - we recommend using dutch processed cocoa powder for the chocolate layer, it is washed with an alkaline solution which neutralises the acid in the powder giving it a deep rich colour. It also has a milder earthy flavour.
Raising agent - we use baking powder in this tiramisu cake, in the UK the standard supermarket baking powder is double action baking powder, meaning it will work in two phases, one with addition of liquid and then secondly with application of heat.
Mascarpone - the tiramisu cake frosting is made with mascarpone, a soft Italian cheese spread. This is not the same as standard cream cheese, it's light and creamy and super smooth. It is the classic ingredient and flavour profile in Tiramisu. Get the highest quality mascarpone you can find. It's also important for it to be room temperature for this recipe.
Customisations
We all love to make twists in our recipes to meet different needs, here are some customisation suggestions for this tiramisu cake:
Gluten free - if you have a dietary requirement for this cake to be gluten free, you can directly substitute the all purpose flour for gluten free all purpose flour. You may need to add a little extra liquid (milk) to get the right batter consistency. We have not tested this option but if you give it a go, let us know how it goes in the comments.
Simplify - this tiramisu cake recipe can be simplified further by making all the layers either vanilla, coffee or chocolate, instead of multicoloured layers. Simply omit the coffee powder or cocoa powder for vanilla, or add 3 tablespoons espresso powder or ⅓ cup of cocoa powder to the whole cake batter mix for just coffee or just chocolate respectively.
Alcohol - we don't use alcohol in this recipe. If you wish to use alcohol you can make this cake with the coffee liqueur kahlua. Make a 50/50 mix of espresso and kahlua to make a final volume of 1 cup/240ml.
Without coffee - for those who can't or don't want coffee in their cake, you can substitute for a coffee alternative powder instead of normal coffee powder. We tested it with this and it works perfectly.
How to make Tiramisu Cake
Follow this step by step cake to make your new favourite Italian tiramisu cake:
Cake batter - food processor method
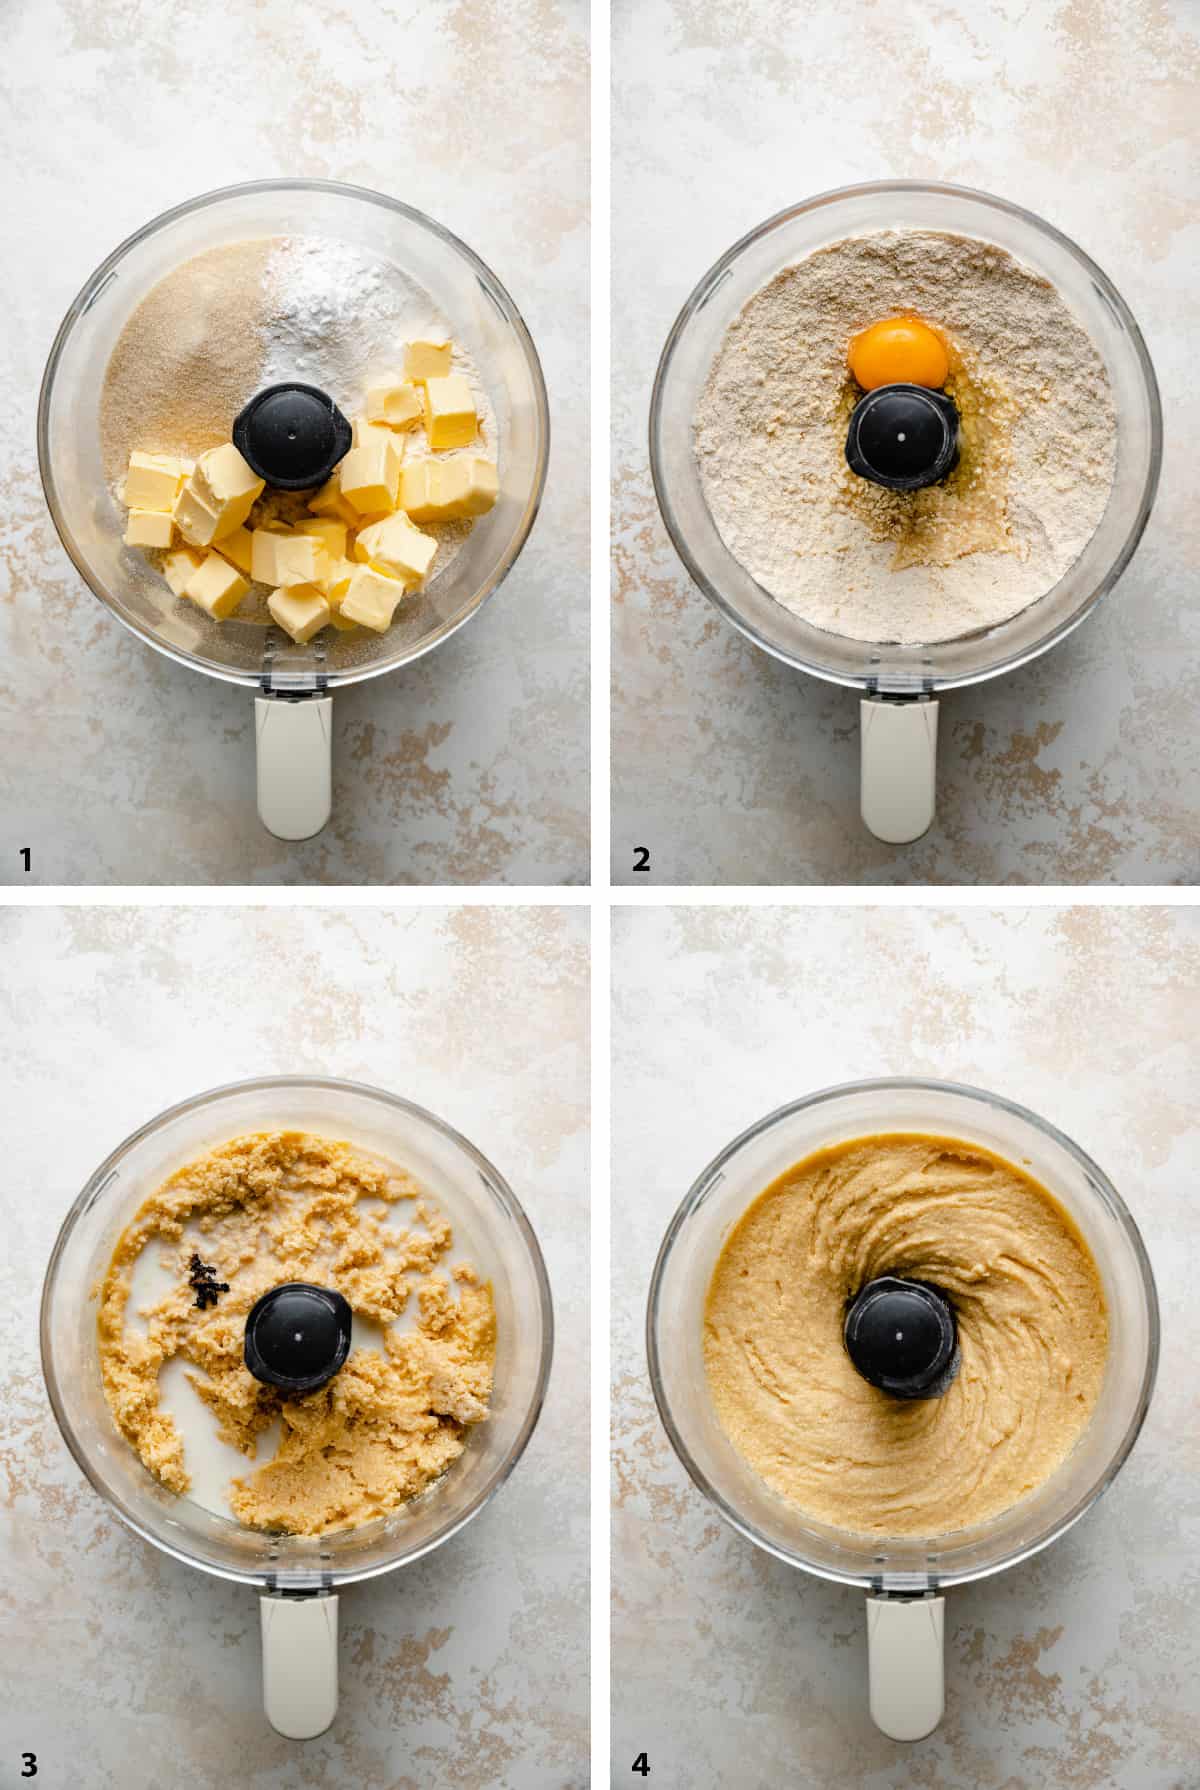
- Place the room temperature butter, sugar, all purpose flour, baking powder and salt into the bowl of the food processor.
- Pulse a few times to combine the ingredients into a fine crumb. Add the eggs one-by one and pulse 2-4 times after each one.
- It should create a sticky batter then add the milk and vanilla extract or seeds.
- Process until just combined. Be careful not to over blend it and introduce too many air bubbles to your tiramisu cake batter.
Cake batter - food mixer method
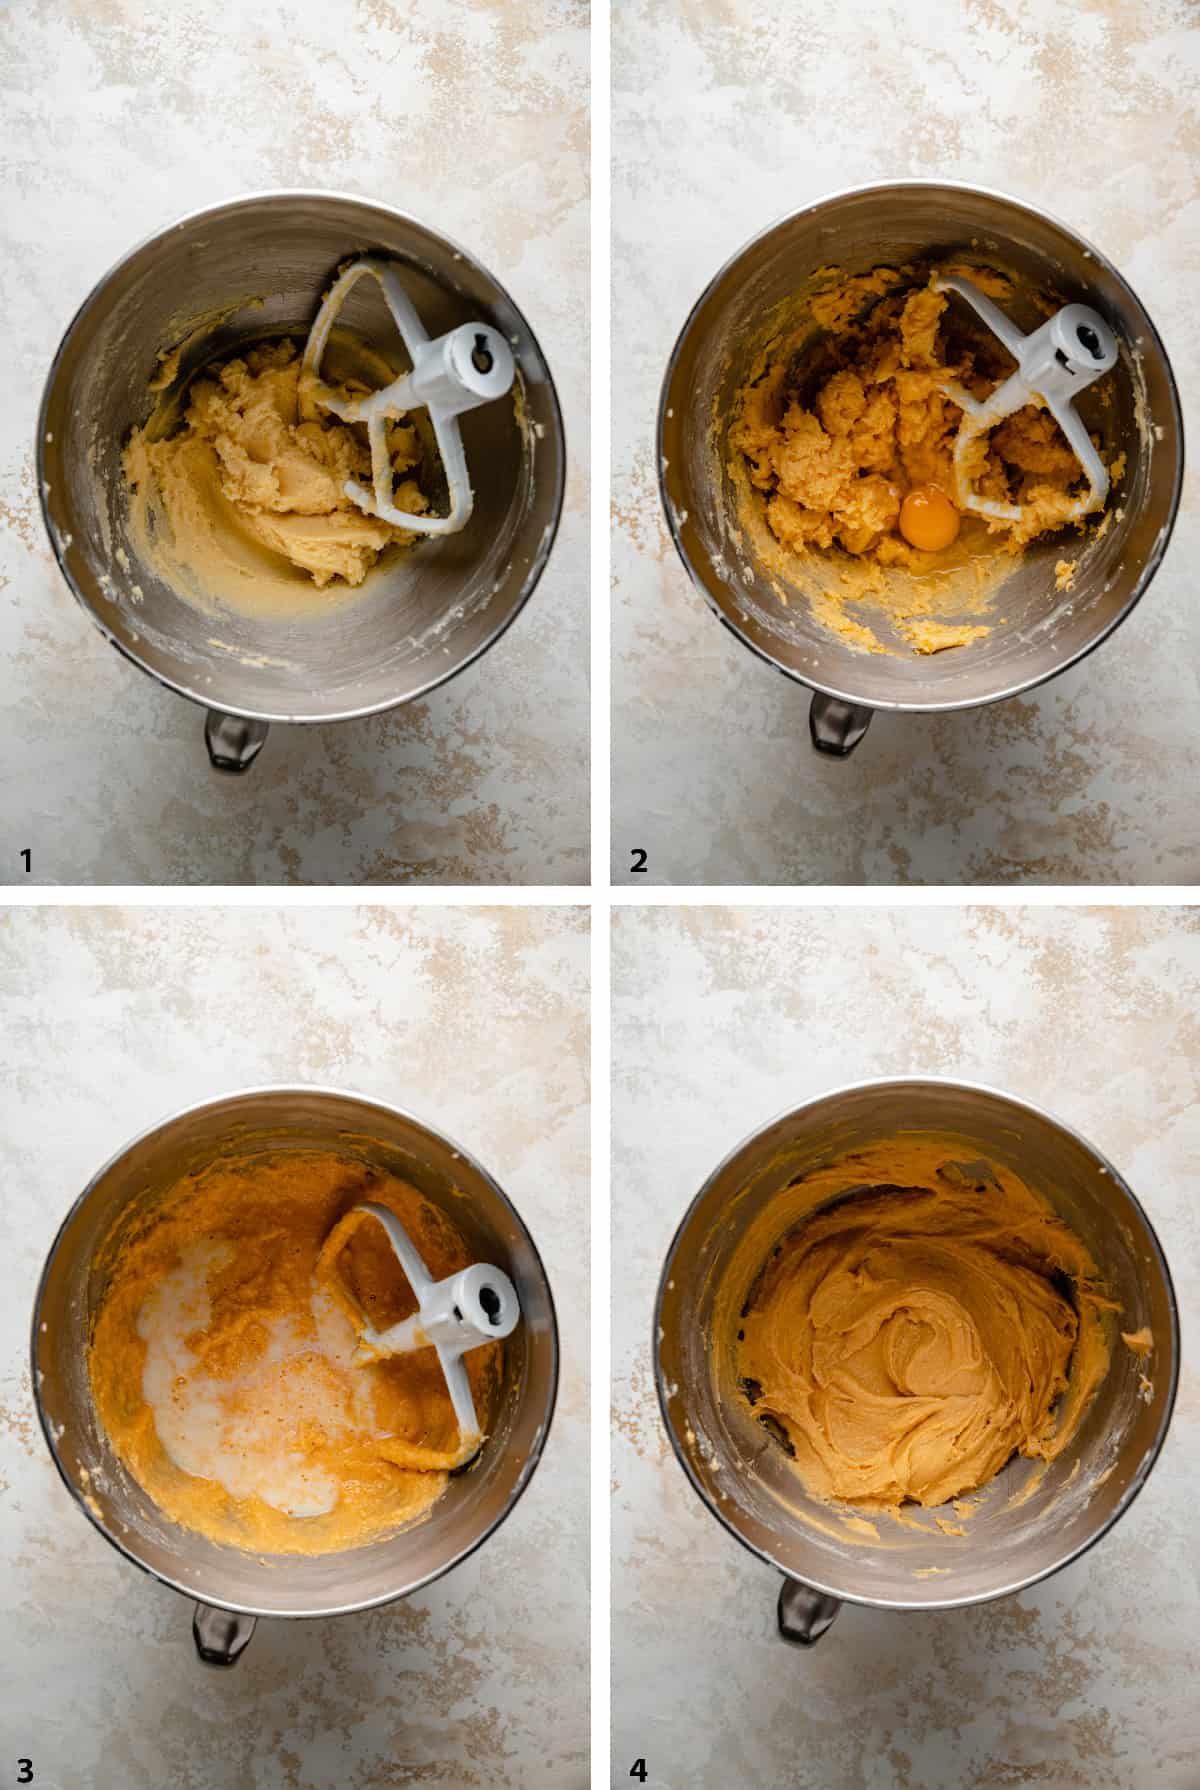
- In a large bowl or stand mixer, cream together the room temperature butter and sugar for 3-5 minutes until smooth and light in colour.
- Beat in the eggs one-by-one with a spoon of flour after each egg.
- Beat in the milk and vanilla.
- Slowly mix in the flour, baking powder and salt mixture until smooth, beat for no longer than 30 seconds.
Making the coloured layers
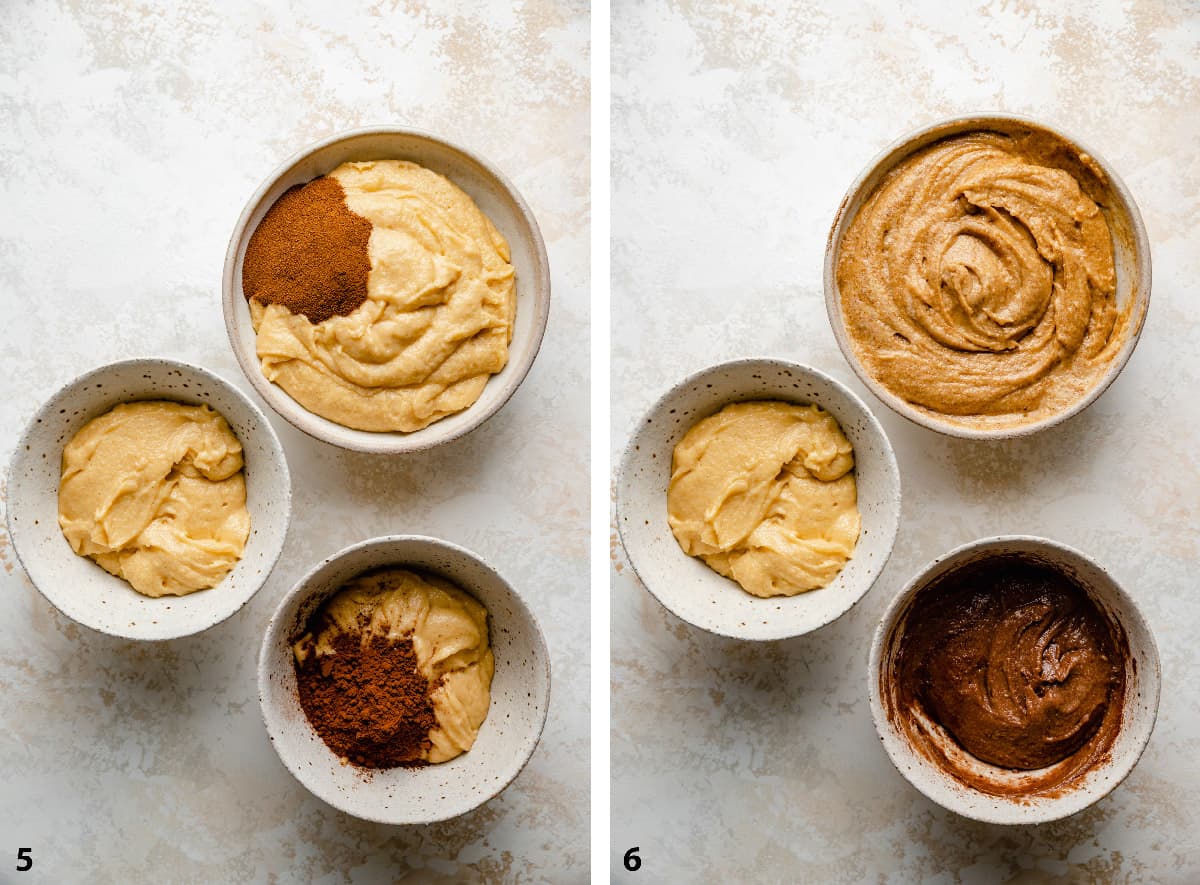
- Weigh the entire batter mix. Separate it into three portions: half into one bowl and two quarters in smaller bowls. Add the espresso powder into the large portion and cocoa powder into one of the smaller portions.
- Fold the powders into each of those portions to create the chocolate and coffee layers, this provides you with one vanilla, one chocolate and two coffee cakes.
Baking the cakes
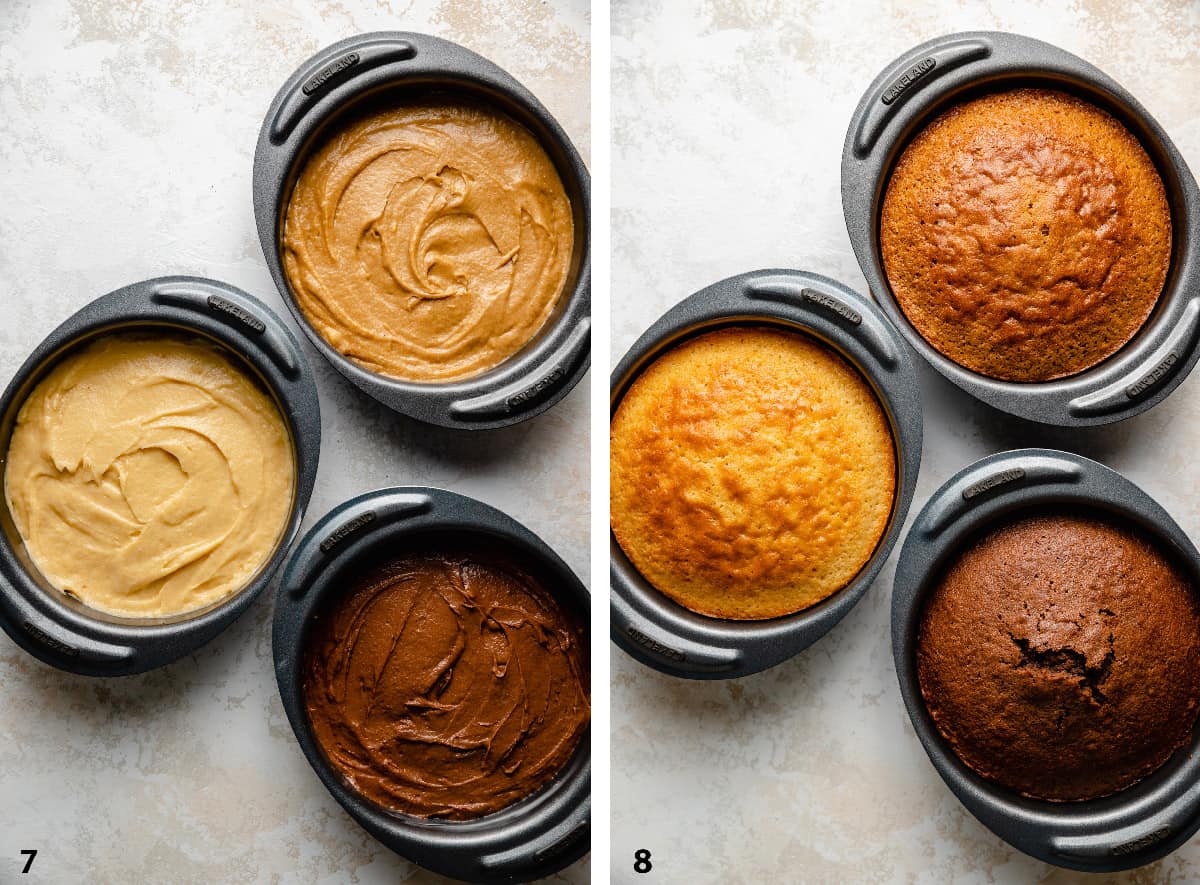
- Split the coffee cake batter between two lightly greased and parchment lined (bottom only) 6-inch cake tins and the chocolate and vanilla layers into another 2 tins.
- Bake in a preheated oven at 180C/350F for 25 minutes until a cake tester comes out clean from each cake and they have a slight bounce to the touch. Leave in the cake tins for 5 minutes, then remove to a cooling rack until cold.
Make the coffee syrup
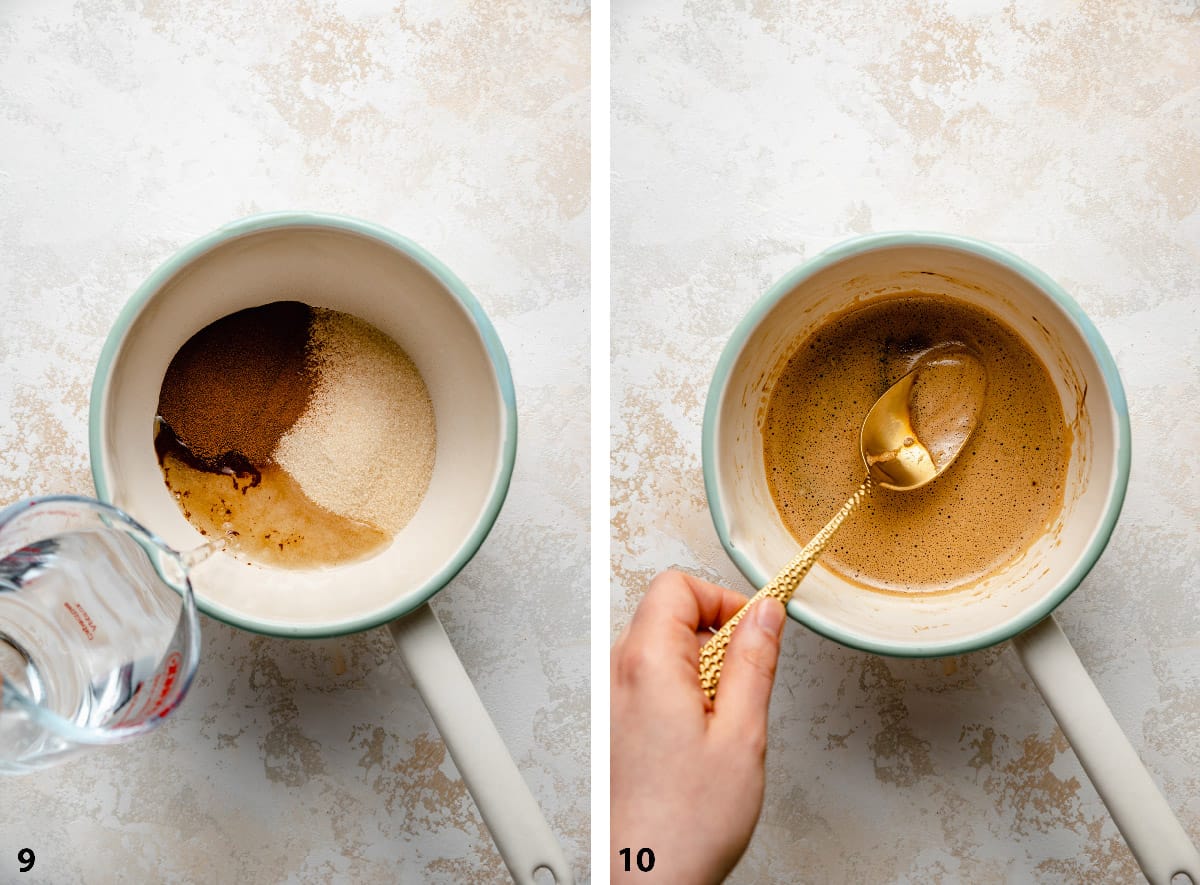
- Whilst the cakes are baking, place the the espresso powder, sugar and water into a small saucepan.
- Bring to the boil and stir until the sugar is dissolved and take off the heat and leave to cool.
Make the mascarpone frosting
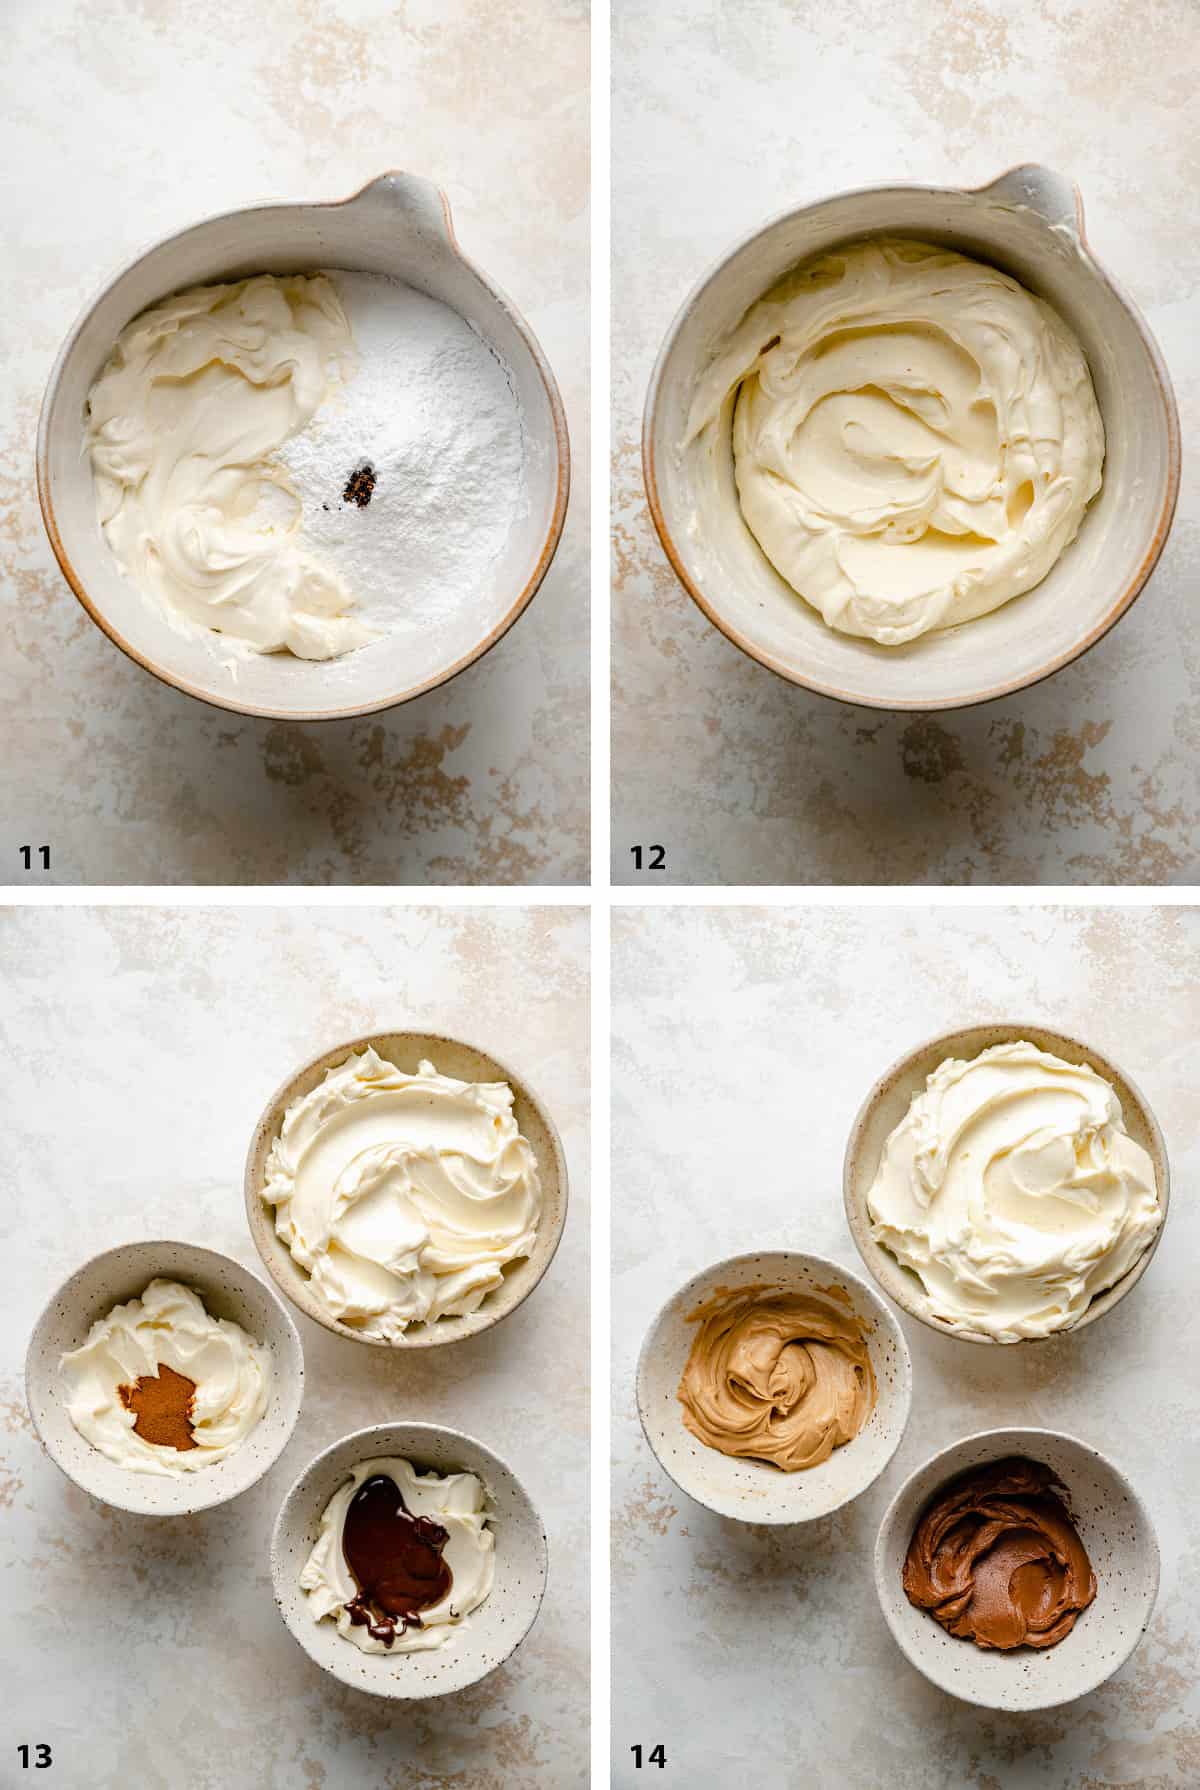
- Place the mascarpone into a large bowl with the sifted icing sugar, 1 tablespoon of milk and vanilla seeds.
- Gently fold the ingredients together (don't beat or overmix) until smooth, adding another tablespoon of milk if needed.
- Measure two portions of 125 grams into smaller bowls and leave the rest in the large bowl. Add the melted chocolate and espresso powder into the smaller portions to make the chocolate and coffee frosting.
- Gently fold the coffee and chocolate portions together until smooth and uniform in colour.
Assembling the Tiramisu Cake
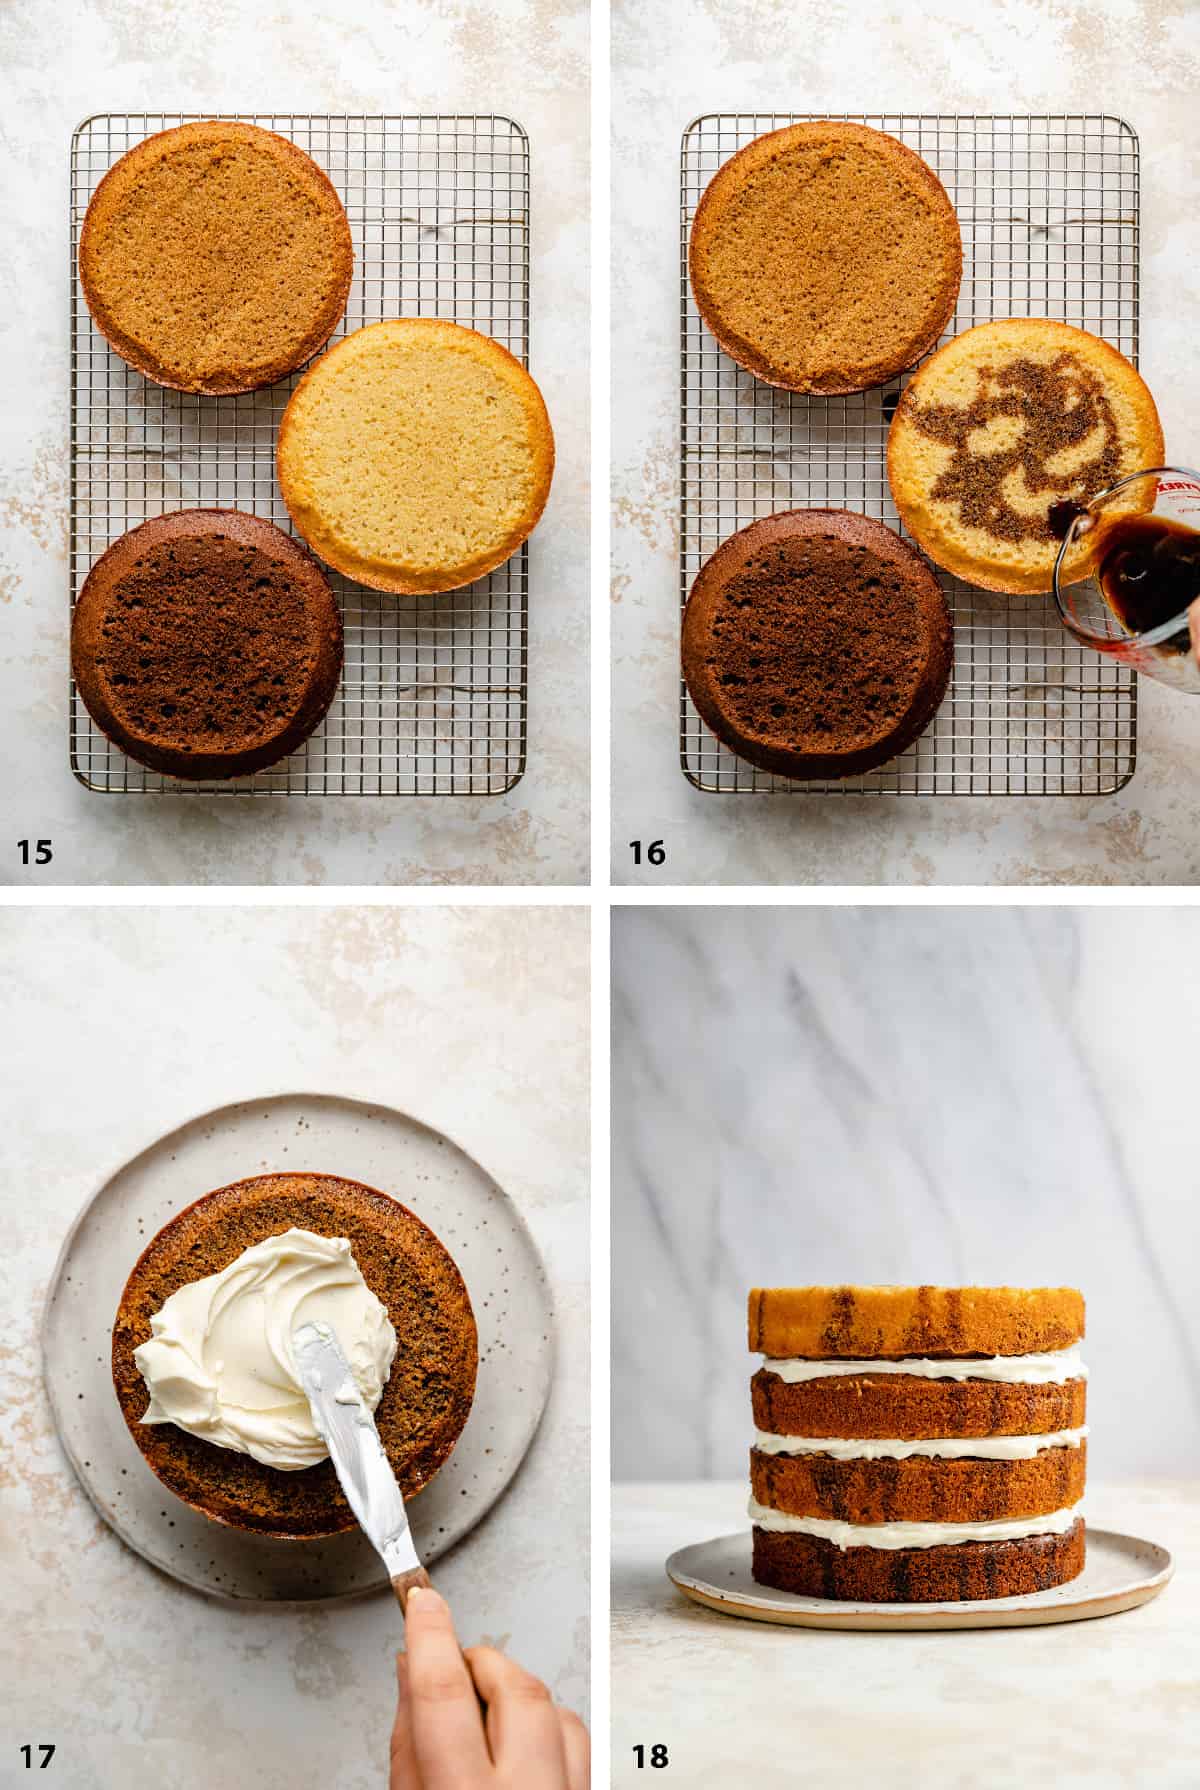
- Level the tops of the cakes using a bread knife to ensure the cake is easy to assemble.
- Pour the coffee syrup evenly between all four layers and allow the syrup to absorb into each layer, there should be about a quarter cup for each layer.
- Place the chocolate layer onto a cake board or plate. Using ⅓ cup of the vanilla frosting, spread it onto the chocolate cake layer.
- Place one coffee layer onto the frosting and repeat with ⅓ cup of frosting. Repeat with the second coffee layer and finally with the vanilla layer to create your tiramisu cake stack.
How to decorate
Follow these simple steps for decorating this tiramisu cake or simply roughly apply the frosting and enjoy the rustic look.
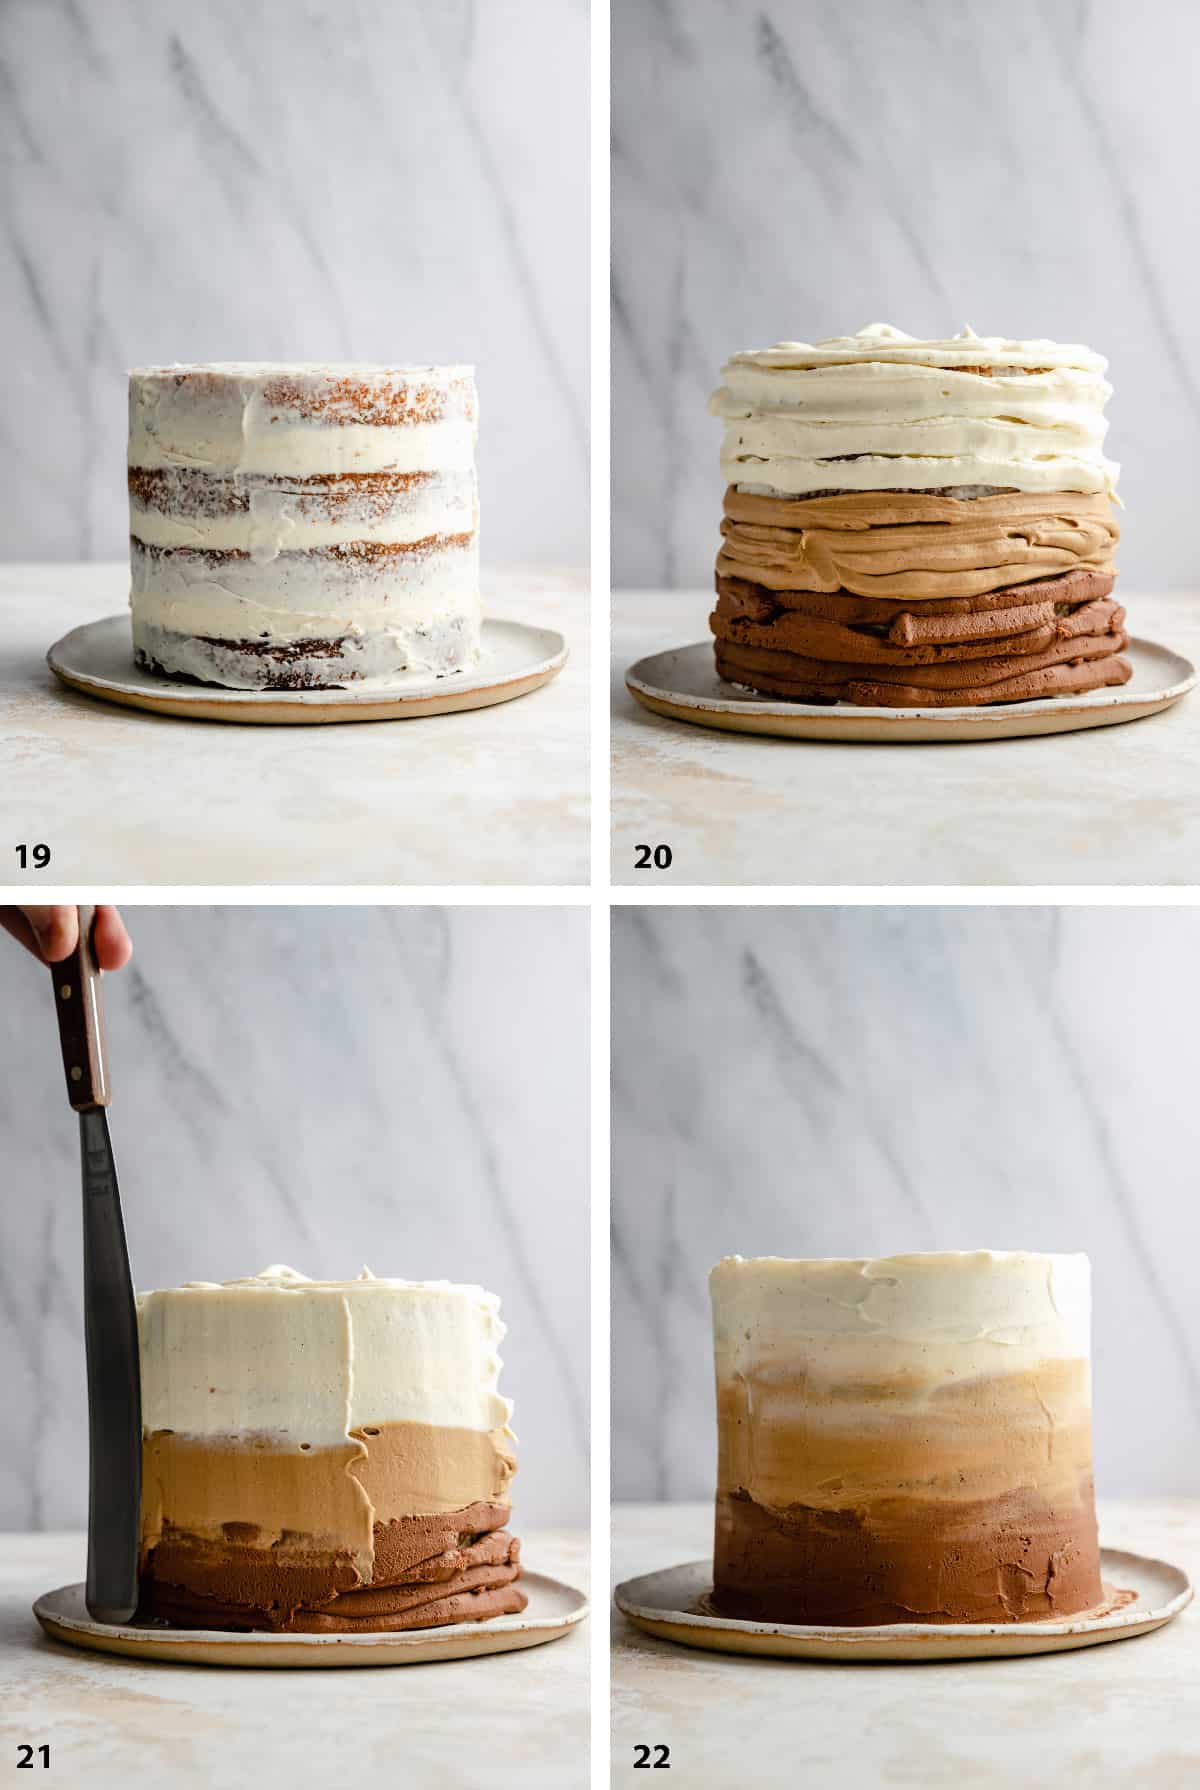
- Finish the tiramisu cake stack with a thin crumb layer of the vanilla frosting and smooth with a spatula. Place in the fridge to set for 15 minutes.
- Starting with the chocolate frosting, pipe or roughly spread it onto the bottom third of the cake, follow with the coffee frosting on the next third and then the remaining third with vanilla frosting.
- Start to spread with a spatula to create the ombre layers
- Smooth the whole cake over. Using a cake turntable is a great way to do this. Finally top the tiramisu cake with a classic thick dusting of cocoa powder.
Expert Tips
Here are some expert tips to ensure complete success in making this tiramisu cake:
Tempering the eggs - if you are using the food/hand mixer method to make the tiramisu cake batter, adding a spoon of the flour mix after each egg tempers the eggs and keeps the mixture whole, otherwise it will start to split and maybe curdle. It will come back together on addition of flour regardless but this will avoid that all together.
Mascarpone - it is VERY important that the mascarpone is at room temperature. This is in order to create the chocolate frosting portion. If you add warm melted chocolate to fridge cold mascarpone it will become grainy or even create a stracciatella effect (bits of chocolate throughout) and won't be smooth. If your frosting becomes too soft, simply return it to the fridge to firm up for a bit.
Baking - if you only have two cake tins, the remaining two portions of tiramisu cake batter will be fine sitting on the side whilst you wait for the others to bake and be removed from the tin. Just clean and prepare the tins again for the next batch.
Quality chocolate - for the chocolate frosting, make sure you use quality dark chocolate at least 74% cocoa or above. Cheap chocolate will likely have additives that will affect the texture of the frosting. Also, once the chocolate has melted, leave to cool for only 1 minute before adding to the frosting and stirring in.
Raising agents - make sure to use baking powder and not baking soda. Ensure that it is fresh and hasn't been sitting in your cupboard for months or years on end.
Storage and Freezing
Follow these steps for storing your tiramisu cake to enjoy it at it's best:
Refrigerator - store your tiramisu cake in the fridge for up to 3 days. We recommend carefully wrapping the cake without disturbing the frosting with clingfilm to protect it whilst in the fridge. The cake is best consumed freshly made but will keep well in the fridge. It will however start to dry out if the sponge is open to the air.
How to freeze it
Sliced assembled cake - if you have sliced the tiramisu cake, lay the slices on a parchment lined baking sheet and place into the freezer until the slices are solid, this will take about 1-2 hours depending on how thick you slice it. Take these slices and wrap them in a clingfilm and then place them into a freezer bag and store for up to 3 months. Defrost before consuming. The longer you leave it in the freezer the more likely the frosting texture may suffer.
Cake layers pre-assembly - If you wish to create this tiramisu cake ahead of time, bake the layers and allow to cool. Double wrap with cling film and then freeze. These layers will store in the freezer for up to 3 months. You can then defrost the layers, drizzle with coffee syrup and assemble with the mascarpone frosting. As above, the longer they are in the freezer, the more likely the texture may suffer.
Recipe FAQs
Yes, absolutely! To make a two layer 8-inch cake you will just need to split the mixture between two prepared 8-inch cake tins. They will likely need to be baked for 25-30 minutes until a cake tester comes out clean. If you wish to make a 4-layer 8-inch cake, you will need to double the whole cake batter and coffee syrup recipe and will likely need to 1.5x the frosting.
If your tiramisu cake layers sink, there are a couple of reasons. You've used too much raising agent. OR you've opened the oven mid baking and the cake structure has been disturbed before it was able to set, this can often lead to a sunken cake. The final reason is underbaking the cake - make sure a cake tester or tooth pick comes out clean or with just a couple of crumbs.
In this recipe you've been instructed to lightly grease and line your cake tins. If you use too much oil or fat (preferably use butter) your cake can turn out greasy. You only need a very light coating of grease to aid rise and help you remove the cake from the tin after baking.
Traditional tiramisu mascarpone layers include raw egg yolks, this cake does not. It does however contain coffee and caffeine or alcohol if you so choose to use in making this cake. However, you can recreate this cake with a caffeine free coffee alternative and not use alcohol at all as the original recipe is written. We do this as we don't drink alcohol or coffee.
Our cake does not contain alcohol as we don't drink. This makes it perfect for younger people to enjoy too. However, if you wish you can use alcohol in the coffee syrup to soak the sponge cake layers as shown in the customisations section of the post.
More Cake Recipes
Love this tiramisu cake? Well, if you want to bake up a storm check out our baking recipes. Here are some extra cakes for you to whet your appetite:
Love this recipe? Leave us a 5-star ⭐️⭐️⭐️⭐️⭐️ rating in the recipe below and don't forget to leave a review in the comments section underneath the recipe. We love hearing from you!
Why not follow along with us on our social media channels @Instagram @Facebook and @Pinterest and tag us with #eatloveeats when you've tried one of our recipes!
📖 Recipe
Tiramisu Cake
Ingredients
- 280 g unsalted butter, room temperature, 1 ¼ cups, 2 ½ sticks
- 280 g golden caster sugar, 1 ¼ cup + 2 tablespoons, superfine sugar
- 280 g all purpose flour, 2 ¼ cups + 1 tablespoon
- 2 ¼ teaspoons baking powder
- ½ teaspoon fine sea salt
- 5 eggs, US large, UK medium
- 60 ml milk, ¼ cup
- ½ vanilla pod, seeds scraped or 2 teaspoons extract
- 1 ½ tablespoon espresso powder
- 1 ½ tablespoon cocoa powder
For the coffee syrup
- 2 tablespoons espresso powder
- 100 g golden caster sugar, ½ cup
- 120 ml water, ½ cup
For the mascarpone frosting
- 750 g mascarpone, 26 ounces
- 125 g icing sugar, 1 cup, sifted
- 1-2 tablespoons milk
- ½ vanilla pod, seeds scraped or 1 teaspoon extract
- 1 teaspoon espresso powder
- 25 g 70% dark chocolate, 1 ounce
To finish
- cocoa powder, for dusting
Instructions
- Preheat the oven to 160°C fan/180°C/350°F. Lightly grease and line 2 (or 4 if you have them and the oven space!) 6" loose bottomed cake tins.
Cake batter - Food Processor Method
- To prepare the cake mixture in the food processor: place the room temperature butter, sugar, flour, baking powder and salt into the bowl of the food processor. Pulse a few times until the ingredients are combined. Add the eggs one by one, and pulse 1-3 times after each egg. Finish by adding the milk and vanilla seeds and process until just combined. Take care not to overmix the batter.280 g unsalted butter, 280 g golden caster sugar, 280 g all purpose flour, 2 ¼ teaspoons baking powder, 5 eggs, 60 ml milk, ½ vanilla pod, ½ teaspoon fine sea salt
Cake batter - Hand/Stand Mixer Method
- Whisk together the flour, baking powder and salt in a medium bowl. In a large bowl or stand mixer, cream together the room temperature butter and sugar for 3-5 minutes until smooth and light in colour. Beat in the eggs one by one, with a spoon of the flour mix after each egg. Beat in the milk and vanilla and then slowly mix in the remaining flour mixture until smooth. Beat it for no longer than 30 seconds.280 g unsalted butter, 280 g golden caster sugar, 280 g all purpose flour, 2 ¼ teaspoons baking powder, 5 eggs, 60 ml milk, ½ vanilla pod, ½ teaspoon fine sea salt
Making the Coloured Layers
- Weigh the entire batter mix. Then separate the batter into 3 portions - half and two quarters. Our full batter measured as follows - 1150g. Half = 575g, Quarter = 287g. Roughly measured is just fine.
- Into the largest portion, carefully fold in the espresso powder. Into one of the smaller portions, fold in the cocoa powder. Leave the remaining smaller portion as it is. Omit this step if you aren’t going to do coloured layers and just split the mixture between four 6 inch cake tins.1 ½ tablespoon espresso powder, 1 ½ tablespoon cocoa powder
Baking the Cakes
- Split the coffee mixture between the two tins and level the tops. Place in the oven and bake for 25 minutes or until a skewer inserted comes out clean. Leave to cool for 5 minutes in the tin before removing and transferring to a cooling rack. Clean the tins, grease and line again and pour the vanilla and chocolate portions of the batter into each one. Bake as above.
For the Coffee Syrup
- Place the espresso powder, sugar and water into a saucepan. Bring to the boil and stir until the sugar has dissolved, Remove from the heat and cool.2 tablespoons espresso powder, 100 g golden caster sugar, 120 ml water
For the Mascarpone Frosting
- Place the mascarpone into a large bowl. Add the icing sugar, 1 tablespoon milk and the vanilla seeds. Using a spatula, gently stir together until the mixture is smooth, adding up to another tablespoon of milk if needed. Separate off two portions of 125g of frosting into two smaller bowls, leave the rest in the original mixing bowl.750 g mascarpone, 125 g icing sugar, 1-2 tablespoons milk, ½ vanilla pod
- Melt the chocolate in a heatproof bowl over a pan of simmering water or in the microwave in 30 second bursts. Leave to cool for one minute. After this time, stir the chocolate into one of the smaller portions of mascarpone frosting. Stir the espresso powder into the other smaller portion of mascarpone. Leave the biggest portion as it is.1 teaspoon espresso powder, 25 g 70% dark chocolate
Assembling the Tiramisu Cake
- Level the tops of the cakes using a bread knife if necessary. Pour the coffee syrup evenly over the tops of the cakes and allow to soak in. The cake will be easiest to assemble if you have a cake turntable in order to achieve a smooth frosting. If not, don't worry, you can go for a more rustic look!
- Place the chocolate cake onto a cake board/stand or plate (use a turntable if you have one). Evenly spread ⅓ cup of vanilla frosting on top, place a coffee cake on top followed by ⅓ cup of frosting, then the next coffee cake layer and ⅓ cup frosting and finally the vanilla cake layer. Using ⅓ cup of vanilla frosting lightly coat the outside of the cake all over (crumb coat). Place in the fridge to set for 15 minutes.
Creating the Ombre Frosting
- Starting with the chocolate frosting, pipe or roughly apply the frosting to the bottom quarter of the cake. Follow by applying the coffee frosting to the next quarter of the cake. If the two layers overlap, that's good! It adds to the ombre effect. Cover the rest of the cake roughly with vanilla frosting. You will have leftover frosting which is helpful if you need to do any touch ups!
- Smooth out the frosting to achieve a clean finish as in the photos above, or roughly spread the frosting for a more rustic look if you prefer! Finish with a thick dusting of cocoa powder on top.cocoa powder
Penny says
This cake looks amazing and perfect to try for my tiramisu-loving hubby's birthday! I'll share how it goes if I do manage some home baking in between building works going on at home and preparing for the impending arrival of a new tiny person in our family lol.
I know I'm a little 'late to the party' with this, as the post is not recent. However, on the chocolate frosting issue that your readers had - I wonder whether it was about the temperature of the mascarpone when the melted chocolate was stirred through it? I think if the mascarpone was fairly cool, it would mean the chocolate would cool quickly on bring stirred through it and I think that would cause it to go grainy?
Sasha says
Hi Penny! I hope you get chance to bake the cake - it sounds like you have lots going on! Good luck with everything 🙂
As for the chocolate frosting, it's really hard to tell what the issue is in individual cases. I know that when I used just melted chocolate and fairly cool mascarpone, it worked out fine! I had a lady email me recently who was having issues based on the brand of mascarpone she was using! I hope it works out for you - do let me know if you have any issues!
Reynaldo M. Manangan says
Hi I would like to know if it is possible to cover the tiramisu cake with fondant.
Sasha says
Hi Reynaldo - you could certainly cover this cake with fondant, although it wouldn't really taste like tiramisu then! If you're planning on keeping it for a while, I'd recommend filling the layers with buttercream or jam instead of mascarpone as it will keep better. If you're planning on eating it soonish though, you could still fill the layers with the mascarpone frosting for that tiramisu taste!
Beth says
This looks amazing! 😀 Just wondered where's best to store it once it's made? ...fridge or room temp? Container or not? Thank you!
Sasha says
Hi Beth! So glad you like the cake! When I made it I stored it uncovered in the fridge - but let's face it, it didn't last long! I'm not a fan of keeping sponge cake in the fridge but I didn't really want to leave the mascarpone at room temp since it was summer at the time. You might be ok at this time of year but that's up to you to decide what you're comfortable with!
Beth says
Ahh thank you very much, I'll be making it next week and taking it up to Liverpool for a birthday so I'll probably keep it in the fridge and try and keep it as cold as possible for the journey. Thank you! Looking forward to making it 🙂
Sasha says
Ooh exciting! Let me know how it goes! 🙂
Fanny says
Hi Sasha, I came across your recipe and decided to give it a try. The cake was amazingly delicious! And I just wanted to let you know that I posted it on my blog and shared your recipe link. Thank you for sharing such wonderful recipe.
Sasha says
Hi Fanny! I'm so happy that you made my cake! Your version looked delicious! Thanks for sharing 🙂
Katerina says
Hi Sasha! Thank you so much for this recipe. I made this cake for my birthday a couple of days ago and it was a massive hit. Very delicious and impressive! Here is my take:
https://www.instagram.com/p/BNm-h1LDCdn/
Just a couple of twists. I added some whipped double cream in the frosting to make it more fluffy and soft. I also added cognac in the frosting and in the syrup, too. It turned out amazing!
Sasha says
Hey Katerina! I'm so happy that you loved the cake! Your tweaks sound delicious and the end result looked wonderful! Thanks so much for making the cake and sharing it with me 🙂
Kar says
Hello! I'm making this cake this evening, but I was wondering what you'd recommend as to storing it. I'm assuming the fridge would be the best once it's assembled.
Sasha says
Hey Kar! Yes, I stored the cake in the fridge. It might be ok in a cool kitchen for a while though, but if you're keeping it for a few days then definitely the fridge. I hope it turns out well! 🙂
Debbie says
Thank you so much for sharing this recipe! I've just thoroughly impressed my family and friends making this cake for my partner's birthday. I've never attempted a layer cake before, nor has my icing extended beyond pouring some ganache or buttercream on top. This was the nicest cake mix I've ever tried too! I ate way too much mixture making it. Anyway I doubled the recipe and it still only needed 20 min per cake. They cooked perfectly and ended up having quite a large crumb. I froze them then iced the next day and the ganache drip added a lovely touch. Not to mention it tasted amazing too! Hopefully you can see how beautifully it turned out here. https://instagram.com/p/BLS36mzgD-0/ Thanks again for sharing!
Sasha says
Wow, Debbie! It looks amazing! 😀 I'm so glad you enjoyed the recipe - and for a first attempt at a layer cake you did amazingly well! I love the ganache and all the toppings! Thanks for showing me how it turned out for you 🙂
Céline says
Thank you Sasha, I can't wait to try it again!
Celine says
This looks amazing, and yes, the photography definitely adds to the effect. Beautiful, so much talent!! I'm going to try it this weekend for my dad's birthday; I'm a bit (very!) nervous, but the instructions are so clear that I hope it turns out at least partly as expected 🙂 thanks for sharing!
Sasha says
Aww thank you Celine! I'm so happy that you're going to give it a go! I'd love to see how it turns out! Have a lovely weekend and happy birthday to your dad! 🙂
Celine says
I did it, I made it! and I had lots of fun doing so 🙂 It is far from being as perfect as yours and I picked up a number of lessons along the way that I'm happy to share.
First, let me say that I am not an experienced baker, so I probably failed where others would have found better solutions.
To start off, there is a heat wave in Brussels these days, and that does not go well with (any sort of) baking, and I don't have any air-conditioning in the apartment... I tried to assemble the cake as quickly as possible, but the mascarpone frosting warmed up way too quickly and ended up being very runny. I guess I should have taken the time to let it cool again after adding the different ingredients and before spreading it. Because the frosting was not very firm, I could not get a thick enough layer between the cakes or on the sides which was a bit lacking for the overall taste balance.
Also, I did not manage to get that lovely dark colour for the chocolate mascarpone frosting. It ended up gritty and a pale colour (a bit like Lindsay described) and I had let it cool for over 30 minutes (the bowl and content were cool). Does it still need to be slightly (ever so slightly) warm?
My cakes came out really flat (about 1cm thick), but I think there are multiple reasons for that: I started with the blender but the batter just would not blend, so I moved to a regular stand mixer but the ingredients were not in the right order for that. Just a question, how soft is your butter for preparing the cake batter?
Because of the heat, I was very afraid that the whole cake would collapse, so I did not dare pour all the syrup on the cakes - well I should have, it was a little dry.
I watched the video for the ombre frosting, but it was my first try so it wasn't as neat, although there was a good blend starting there.
OK, so I'm maybe not the best advocate for your recipe, but I insist that I had lots of fun following it and I see the potential. I can't wait to try it again (as soon as the temperatures go back to normal)
Thanks again!
Celine says
Oh, I took a picture, not sure if you can see it here? https://www.facebook.com/photo.php?fbid=10154337410245435&set=a.10154284084350435.1073741832.568145434&type=3&theater
Sasha says
Hey again Celine! Thanks so much for your feedback - it really is very valuable to me. Your cake looked lovely! How did it taste?
I'm sorry to hear that you had difficulty making the frosting. I'm going to test the recipe again and see how it turns out. It's really important to me that the recipe is clear and works well so I'm going to try and get to the bottom of this!
As for the cake batter, it is important to use soft room temperature butter so that all of the ingredients incorporate properly. I don't recommend using a blender to make the batter, but you can use either the food processor or a stand mixer!
I'm glad that you had lots of fun baking the cake! It certainly looked delicious and I hope it tasted good. I'll try and get back to you ASAP with the results of my testing so that you can give it a go again! 🙂 x
Celine says
The taste was great. The combination of the four layers was very nice and the frosting was delicious. Next time I will increase the amount of frosting between the layers and use all the syrup for the cakes and it will be perfect. Strangely (or perhaps not so strange) I found that it tasted even better the next day. I made it in the morning for the dinner that day and found the all the flavours came out even more when enjoying the left overs the next day...
Thanks for all the tips.
Sasha says
Celine! I'm so glad you enjoyed the cake. Just wanted to let you know that I retested the frosting and have updated the post with my findings 🙂
Lindsay says
Just made this for my mum's birthday. https://www.instagram.com/p/BJCfzgyA5-K/.
The only thing I had trouble with was the chocolate icing. I found adding the chocolate made the icing go extremely gritty and sloppy - I wonder if the chocolate hadn't cooled enough? Luckily I had additional vanilla so just added cocoa powder to that and it did the job.
Hope she likes it! 😀
Sasha says
Hey Lindsay! I'm thrilled to hear that you made the cake - it looks delicious!
That's really valuable feedback about the icing. My instinct would be that you didn't let it cool enough - I left mine to cool for quite a while so I'll adjust the recipe to reflect that. I'm happy that you were able to salvage it though!
Hope you and your mum love devouring it! 🙂
Sowmya Halemane says
Hi Sasha, so good looking cake..am so tempted to try it..where do I find the recipe for chocolate frosting, coffee frosting and the vanilla frosting
Sasha says
Hi Sowmya! The recipe for the frosting is included within the main recipe - basically you make a plain frosting, then divide it up and add coffee and chocolate to two of the portions! It's explained further within the recipe 🙂
Sowmya Halemane says
Thank you, cant wait to try!!
Hannan says
OMG this looks lovely!!! That frosting ??? I do hope you had a good birthday. Just a wee question, if I may - did the 4tsp of baking powder affect taste/texture? It just feels like a lot but your pictures evidently show no negative side effects ? It looks super amazing, can't wait to give it a try!!!
Sasha says
Hey Hannan! Thank you, you're so sweet! As for the baking powder - I never ever have self-raising flour in the house and so I always adapt recipes that use it to plain all-purpose + baking powder. I don't taste it and I have quite a keen palate. And the texture is lovely too. If you do give it a try and find that it doesn't work for you, do let me know!! I really hope you do make it because it's delicious! 🙂
Lorena says
Wooooooow!!!! Sasha, that cake looks absolutely gorgeous! And the photography is amazing, too!
Sasha says
Thank you Lorena! I was so happy with how it all turned out! x
Shannon says
This is an absolutely beautiful cake and I soooo love tiramisu AND my birthday is coming up so I should probably make this for myself as well!
Sasha says
Oh I think you do! It will be a great birthday present to yourself! Let me know how it turns out if you make it, Shannon 🙂 x
Lindsey @ Butter & Type says
This cake is drop dead gorgeous! I'll definitely be making this soon!
Sasha says
I really hope you do make it Lindsey! I'd love to see it if you do!!
Ruth says
This looks incredible! Love the ombré. Where is the cake stand from? It's beautiful.
Sasha says
Thanks Ruth! The cake stand is from H&M! Isn't it gorgeous?!
Aimee says
This is absolutely GORGEOUS! I love your photography <3
Sasha says
Aww thanks so much Aimee! That means a lot as I'm never quite happy with my photography!
ALL THYME FAVOURITES says
WOW. This cake looks incredible!! You've inspired me to mess around with Ombre frosting - I shall link back if I upload the creation, thank you! 🙂
Sasha says
I'm happy I've inspired you! I would love to see your creations if you have a go 🙂
Thalia @ butter and brioche says
oh my god this cake is incredible! i love the photos and how perfect the frosting is!
Sasha says
Hey Thalia! Glad you like it, I'm really happy with how it turned out! 🙂
Michelle @ The Last Food Blog says
Belated happy birthday Sasha! Oh my goodness, that cake is amazing and perfect and beautiful! The perfect celebration cake, well done x
Sasha says
Thanks Michelle! I certainly had a wonderful birthday eating this cake! 😀
Hana | Nirvana Cakery says
Vow, check out this cake! What a beauty! Love the ombre frosting:)
Sasha says
Thanks Hana! I was so chuffed with the frosting 🙂